

If you just finished an AM5 build and your DDR5 is running slower than the speed on the box, you are seeing the default JEDEC speed, not the advertised kit speed. Learning how to enable EXPO or XMP on an AM5 motherboard is the step that tells the board to apply the memory profile stored on your RAM sticks, so you get the performance you paid for.
This decision is part of a larger build plan. Your resolution and refresh target determines how much memory bandwidth matters, your platform and socket locks you into AM5 and DDR5, your case size and clearance affects cooler choice and airflow around the VRM and DIMMs, your power budget decides how much headroom you have for overclocked memory voltage, and your current versus next upgrade path decides whether you want a board that is simple to set up now or one that leaves room for faster kits later. For more background on tuning and fixes, browse the Troubleshooting & Optimization archive.
What Actually Matters
EXPO vs XMP and What Your AM5 Board Actually Supports
On AM5, AMD EXPO is the native memory overclocking standard and Intel XMP is the Intel standard. Many AM5 boards list support for both, which you can see per the spec sheet. For example, some GIGABYTE B650 boards explicitly list AMD EXPO and Intel XMP Memory Module Support, while others list AMD EXPO Memory Module support only. That distinction matters when you shop for kits.
If you buy an EXPO kit, an AM5 board with EXPO support will usually show an EXPO profile by name in BIOS. If you buy an XMP-only kit, a board that lists both standards can still apply the XMP profile, but you may need to select it manually and it may use slightly different voltages and timings than an EXPO kit tuned for AMD. When in doubt, check the board QVL and the RAM packaging. Owners commonly report that EXPO kits tend to apply cleanly on AM5 with fewer manual adjustments.
Where the Setting Lives in BIOS and How It Applies
On AM5 motherboards from GIGABYTE and MSI, the EXPO or XMP toggle is in BIOS, usually on the main Easy Mode screen and also under the overclocking or memory settings in Advanced Mode. You will see options like Disabled, EXPO, XMP, or A-XMP depending on the vendor. Selecting the profile automatically changes frequency, primary timings, and DRAM voltage to the values stored on the memory.
The process is similar across vendors. Enter BIOS by pressing Delete during boot, find the memory profile option, choose Profile 1 for the advertised speed, confirm that the frequency and voltage look correct, then Save and Exit. The system will retrain memory and reboot, which can take longer than a normal boot on AM5 after a memory change. If it fails to boot, the board will usually fall back to JEDEC after a few retries or after a CMOS reset. BIOS updates and overclocking are done at your own risk and may void warranty, so only update BIOS if you need support for a newer CPU or a stability fix, and always follow the manufacturer instructions. Use anti-static handling and avoid touching contacts while the system is powered.
Stability, Topology, and Realistic Speed Expectations
AM5 is DDR5 only and the memory controller is on the CPU. The board spec may list very high numbers like DDR5 Memory Boost 8400+ MT/s (OC) on the MSI MAG B850 Tomahawk MAX WiFi Motherboard, ATX, but that figure is an overclock ceiling under ideal conditions, typically with one DIMM per channel and a single-rank configuration, often noted as 1DPC 1R. It is not a guarantee for every kit or for four DIMMs.
For most gamers, two DIMMs are easier to stabilize than four, and a 2x16GB or 2x32GB kit from the QVL is a safer choice than mixing kits. If you populate all four DIMM slots, you may need to run at a lower speed than the box rating or loosen timings manually. Also remember that enabling EXPO or XMP is considered overclocking, so stability depends on your specific CPU silicon, BIOS version, and kit quality. If you want a deeper look at how cooling and case airflow affect stability, the guide on how to choose a CPU cooler for ryzen 7 9800X3D is a useful companion.
Board Power and Thermal Design That Helps Memory Overclocking
Memory overclocking does not happen in isolation. A board with a stronger power design and better cooling can hold steadier voltages under load, which helps with both CPU and memory stability. Per the spec sheet, examples in this range include Digital 8+2+2 Power Phase with 6-Layer PCB on one GIGABYTE B650E model, 12+2+2 Phases Digital VRM Solution on another GIGABYTE B650 model, Twin 14+2+1 Phases with 70A Power Stage and 8-Layer 2X Copper PCB on the GIGABYTE B650 AORUS Elite AX AMD AM5 ATX, and a 14 Duet Rail Power System with 80A SPS VRM on the MSI MAG B850 Tomahawk MAX WiFi Motherboard, ATX.
Thermal features also matter. Look for Advanced VRM heatsinks, M.2 Thermal Guard, EZ M.2 Shield Frozr II, and extended heatsinks that keep the VRM and storage area cooler. These do not directly raise memory speed, but they reduce thermal throttling and voltage droop that can cause crashes when EXPO or XMP is enabled. If you are comparing cooler clearance and case airflow at the same time, you may find the roundup of the best air cooler for ryzen 7 9800X3D helpful for checking height and RAM clearance.
A few options that show the range are listed below. Use them to compare how vendors describe EXPO and XMP support, VRM design, and memory overclocking headroom.
This article contains affiliate links. If you buy through one of our links, CustomPCGaming may earn a commission at no extra cost to you. Commissions never influence which products we recommend or how we rank them. Read our Affiliate Disclosure for details.
Quick Picks at a Glance
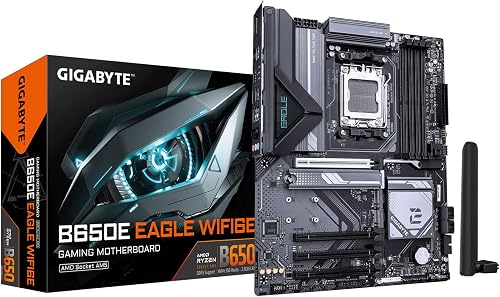
GIGABYTE B650E Eagle WIFI6E AM5 ATX Motherboard

GIGABYTE B650 Eagle AX AM5 ATX Motherboard

Prime MSI MAG B850 Tomahawk MAX WiFi AM5 ATX Motherboard

GIGABYTE B650 AORUS Elite AX AM5 ATX Motherboard
As an Amazon Associate we earn from qualifying purchases. Product prices and availability are accurate as of the date/time indicated.
Pros
- Excellent next gen support with PCIe 5.0 and DDR5 up to 256GB
- Strong 8+2+2 digital power delivery with premium chokes and capacitors
- Integrated WiFi 6E and 2.5GbE eliminates need for add in cards
- Builder friendly features like Q-Flash Plus, EZ-Latch and preinstalled I/O shield
Cons
- Only four SATA ports may limit storage heavy builds
- Lacks WiFi 7 and USB4 found on higher end X670E boards
- Full ATX form factor requires mid tower or larger case
The GIGABYTE B650E Eagle WIFI6E is a full size ATX motherboard designed for AMDs AM5 platform, supporting Ryzen 7000, 8000 and 9000 series processors. It is aimed at gamers, creators and DIY builders who want PCIe 5.0 and DDR5 performance without paying for flagship X670E pricing.
Performance is a clear highlight thanks to PCIe 5.0 for both graphics and M.2 storage, plus three M.2 slots for high speed NVMe drives. Combined with DDR5 support for up to 256GB and AMD EXPO profiles, it delivers fast boot times, smooth gaming and strong multitasking for demanding workloads.
Build quality is solid with a 6 layer PCB, premium chokes and capacitors, and an 8+2+2 digital power phase for consistent power delivery. Advanced VRM heatsinks keep thermals under control, while the integrated I/O shield, EZ-Latch for M.2 and PCIe, and RGB Fusion add convenience and clean aesthetics.
There are a few tradeoffs to consider. The board offers only four SATA ports, which may be limiting for users with extensive storage needs, and it sticks with WiFi 6E rather than the newer WiFi 7 standard. As an ATX board, it also needs a compatible mid tower or larger chassis, so compact builders should look elsewhere.
Overall, the B650E Eagle WIFI6E strikes an impressive balance of future proof features, connectivity and value. If you are building a new AM5 system and want long term upgrade headroom with modern essentials, it is a smart and reliable foundation.
Platform: AMD Socket AM5, B650E chipset, ATX form factor, supports Ryzen 7000, 8000 and 9000 series
Memory and Storage: 4x DDR5 DIMMs up to 256GB with AMD EXPO, 3x M.2 slots with PCIe 5.0 support, 4x SATA 6Gb/s ports
Expansion and Connectivity: PCIe 5.0 graphics slot, 4x PCIe slots total, WiFi 6E, 2.5GbE LAN, USB-C 3.2 Gen 1, HDMI, 9x USB ports
Special Features: 8+2+2 Digital Power Phase, 6 Layer PCB, Advanced VRM heatsinks, Q-Flash Plus, EZ-Latch, RGB Fusion, Integrated I/O Shield
Pros
- Excellent value with premium features like PCIe 5.0 M.2, DDR5 and WiFi 6E
- Stable power delivery and thermal guards keep performance consistent under gaming and heavy loads
- Generous expansion with triple M.2, four DDR5 slots up to 128GB and four PCIe slots
- User-friendly UEFI BIOS and Q-Flash Plus praised by first-time builders for easy setup
- Strong wired and wireless connectivity plus versatile rear I/O for peripherals
Cons
- Only one M.2 slot is PCIe 5.0, the other two are PCIe 4.0
- Limited to GbE LAN instead of faster 2.5GbE found on some competing B650 boards
- Full ATX size requires a mid or full tower case, not suited for compact builds
The GIGABYTE B650 Eagle AX is an ATX motherboard built for AMD AM5, supporting Ryzen 7000, 8000 and 9000 series processors with DDR5 memory. It is ideal for gamers, creators and first-time builders who want modern features and a clear upgrade path without moving to a premium chipset.
In real world use it delivers smooth gaming and multitasking thanks to its 12+2+2 phase digital VRM and DDR5 support with EXPO and XMP profiles. The triple M.2 layout with one PCIe 5.0 slot is a standout for video editing and large game libraries, while WiFi 6E and USB 3.2 Gen2x2 Type-C keep wireless and wired transfers fast.
Design and build quality are strong with a stealthy black Eagle aesthetic and reinforced thermal guards for the VRM and M.2 drives. The layout offers four DDR5 DIMM slots up to 128GB, four PCIe slots and generous rear I/O including HDMI, DisplayPort and multiple USB ports, all controlled through an intuitive UEFI and Smart Fan 6.
There are a few tradeoffs to note. Only one M.2 slot runs at PCIe 5.0 speed while the others are PCIe 4.0, and networking is limited to GbE LAN rather than 2.5GbE. Its ATX form factor also needs a mid or full tower case, so it is not suited for small form factor builds.
Overall the B650 Eagle AX hits a sweet spot of features, stability and value in the B650 range. If you want a reliable, future-ready foundation for a Ryzen DDR5 system with strong storage options and modern wireless, it is one of the most versatile choices in its class.
Socket & Chipset: AM5, AMD B650, ATX form factor
CPU Support: AMD Ryzen 7000, 8000 and 9000 Series Processors
Memory: 4x DDR5 DIMM slots, up to 128GB, AMD EXPO and Intel XMP support
Storage: 3x M.2 slots (1x PCIe 5.0, 2x PCIe 4.0) plus 4x SATA 3 ports, M.2 Thermal Guard
Expansion: PCIe slots for GPU and add-in cards, 1x HDMI, 1x DisplayPort
Connectivity: WiFi 6E, Realtek GbE LAN, USB 3.2 Gen2x2 Type-C, total 18 USB ports
Special Features: 12+2+2 Phase Digital VRM, Smart Fan 6, Q-Flash Plus, 24-pin power
Pros
- Powerful 14 phase 80A SPS VRM handles flagship Ryzen 9000 CPUs
- PCIe 5.0 x16 and dual Gen5 M.2 slots for future GPU and SSD upgrades
- Excellent memory support up to DDR5 8400+ OC and 256GB
- Modern networking with Wi-Fi 7, Bluetooth 5.4 and 5G LAN
- Robust cooling and durable server grade PCB design
Cons
- Full ATX form factor requires a mid or full tower case
- Only one full length PCIe 5.0 x16 slot limits expansion options
- B850 chipset has fewer premium features than X870E for extreme overclockers
The MSI MAG B850 Tomahawk MAX WiFi is a full size ATX motherboard built on the AMD B850 chipset for AM5 socket Ryzen 9000, 8000 and 7000 processors. It is aimed at gamers and PC builders who want next gen features without stepping up to the more expensive X870 platform.
Performance is a clear highlight thanks to its 14 Duet Rail 80A SPS VRM and dual 8-pin CPU connectors that handle high core count Ryzen 9000 chips with ease. Combined with PCIe 5.0 x16 graphics support, dual Gen5 M.2 slots and DDR5 overclocking to 8400+ MT/s, it delivers excellent headroom for gaming, content creation and future upgrades.
Build quality is premium with a server grade PCB using 2oz thickened copper, PCIe Steel Armor II on the primary slot and an extended heatsink design. MSI adds thoughtful touches like 7W/mK MOSFET thermal pads, EZ M.2 Shield Frozr II and EZ Clip II that make installation easier and keep temperatures in check during long sessions.
There are a few tradeoffs to consider. As an ATX board it requires a mid or full tower case, and it offers only one full PCIe 5.0 x16 slot which limits multi GPU or extensive expansion options. Users seeking the absolute most connectivity and overclocking features may still prefer an X870E board.
Overall, the Tomahawk MAX WiFi strikes an impressive balance of power, cooling and modern connectivity including Wi-Fi 7, Bluetooth 5.4 and 5G LAN. For most gamers building a Ryzen 9000 system, it offers outstanding value and future proofing in a durable, well designed package.
Socket / Chipset: AM5, AMD B850, supports Ryzen 9000 / 8000 / 7000 Series
Memory: 4x DDR5 DIMM, up to 256GB, 8400+ MT/s OC, SMT slots
Expansion / Storage: 1x PCIe 5.0 x16 with Steel Armor II, 2x M.2 Gen5 x4, 1x M.2 Gen4 x4, 1x M.2 Gen4 x2, 6x SATA ports
Networking / I/O: Wi-Fi 7, Bluetooth 5.4, Realtek 5G LAN, USB 20G Type-C, 7.1 Audio Boost 5 with S/PDIF
Power / Cooling: 14 Duet Rail 80A SPS VRM, dual 8-pin CPU power, Extended Heatsink, EZ M.2 Shield Frozr II
Pros
- Excellent value for a full featured ATX AM5 board
- Robust thermal design with 6mm heatpipe and fully covered MOSFET heatsinks
- Strong connectivity suite including WiFi 6E, 2.5GbE and 12 USB ports
- Easy building experience with EZ-Latch, Q-Flash Plus and clean layout
- Stable performance in gaming and demanding workloads with overclocking headroom
Cons
- Some users report EXPO and XMP memory profiles causing boot failures requiring CMOS reset
- Isolated reports of reboot issues and initial LAN port detection quirks
- Only four SATA ports and no USB4 support for heavy storage users
The GIGABYTE B650 AORUS Elite AX is a full featured ATX motherboard built for AMD AM5, supporting Ryzen 7000, 8000 and 9000 series processors. It is ideal for gamers and creators who want modern DDR5 performance and PCIe 5.0 without stepping up to costly X670 boards.
In real world use it delivers rock solid stability for gaming and demanding workloads, with strong overclocking headroom thanks to its 14+2+1 phase 70A VRM. Users praise its fast PCIe 5.0 M.2 storage, smooth WiFi 6E connectivity and reliable 2.5GbE LAN once configured, plus easy memory tuning via AMD EXPO.
Build quality is a clear strength, featuring an 8 layer 2X copper PCB, fully covered MOSFET heatsinks with a 6mm heatpipe, and PCIe Ultra Durable Armor. Thoughtful builder friendly touches like EZ-Latch for M.2, Q-Flash Plus for BIOS updates without a CPU, and front and rear USB-C make installation clean and simple.
It is not without quirks, as some owners report EXPO and XMP memory profiles can cause boot failures requiring a CMOS reset, and isolated issues with reboot cycles and initial LAN detection. It also offers four SATA ports and lacks USB4, which power users with large storage arrays may find limiting.
Overall, the B650 AORUS Elite AX stands out as a well balanced, future proof foundation for a mid to high end AM5 build. If you want a durable, feature rich board with excellent connectivity and thermal headroom at a sensible cost, this is one of the smartest choices in its class.
Platform: AMD Socket AM5, B650 chipset, ATX form factor, supports Ryzen 7000, 8000 and 9000 series
Memory: 4x DDR5 DIMMs up to 128GB, AMD EXPO and Intel XMP support
Storage and Expansion: PCIe 5.0 M.2, PCIe 5.0 support, 4x SATA 6Gb/s, 3x PCIe slots with Ultra Durable Armor
Connectivity: WiFi 6E, 2.5GbE LAN, 12x USB ports including USB-C 3.2 Gen 2 front and rear, HDMI, 13 total ports
Design: 14+2+1 phase 70A digital VRM, 8 layer 2X copper PCB, M.2 Thermal Guard, EZ-Latch, Q-Flash Plus, RGB Fusion
Matching a Part to Your Build
Scenario 1: First AM5 gaming build with two DIMMs and you want the simplest enable. If you want a straightforward setup with DDR5 and AMD EXPO Memory Module support, the GIGABYTE B650E Eagle WIFI6E AMD AM5 ATX is a clear example. Its spec lists support for Ryzen 9000, 8000 and 7000 Series, DDR5 with 4 DIMMs and AMD EXPO support, plus PCIe 5.0 and Wi-Fi 6E. The trade off is that the spec sheet for this particular model does not list Intel XMP support, so if you already own an XMP-only kit you would need to verify support or choose an EXPO kit for the cleanest one click enable. This board is a good fit if you plan to run a 2-stick EXPO kit at its advertised profile and leave two slots empty for later.
Scenario 2: You want maximum memory overclocking headroom and modern connectivity. The MSI MAG B850 Tomahawk MAX WiFi Motherboard, ATX shows the higher-end pick in this group. It lists DDR5 Memory Boost 8400+ MT/s (OC) with 1DPC 1R, a 14 Duet Rail Power System with 80A SPS VRM, PCIe 5.0 x16 with Steel Armor II, and multiple M.2 Gen5 and Gen4 slots with EZ M.2 Shield Frozr II and EZ M.2 Clip II. It also includes Wi-Fi 7 and 5G LAN for builders who want the newest networking. The cons are specific: the very high MT/s figure is an overclock ceiling that depends on CPU, BIOS, and a 2-DIMM single-rank kit, so you should not expect that speed with four DIMMs or with a mixed kit, and the board has more features than a budget gamer may need.
Scenario 3: Balanced ATX build that needs both EXPO and XMP flexibility. Both the GIGABYTE B650 Eagle AX AM5 LGA 1718 ATX and the GIGABYTE B650 AORUS Elite AX AMD AM5 ATX list 4 SMD DIMMs with AMD EXPO and Intel XMP Memory Module Support, which gives you more choice when shopping kits. The Eagle AX notes a 12+2+2 Phases Digital VRM Solution and Triple M.2 Slots with one PCIe 5.0 and two PCIe 4.0, while the AORUS Elite AX steps up to Twin 14+2+1 Phases with 70A Power Stage, 8-Layer 2X Copper PCB, 6mm Heatpipe and Fully Covered MOSFET Heatsinks. If you want to reuse an existing XMP kit on AM5 or you want the option to shop either standard, these two make the profile selection in BIOS more flexible. Just remember to check cooler height and RAM clearance against your case, and follow the manufacturer mounting instructions for any cooler you install.
Common Mistakes
Mistake 1: Enabling the profile without checking the QVL or DIMM population. Buying a fast kit and enabling EXPO or XMP with four DIMMs populated often leads to boot loops or fallback to JEDEC speed. Check the board QVL for your exact kit part number, prefer two DIMMs for high speeds, and be prepared to run slightly below the box rating if you need four sticks. Owners commonly report that updating to the latest stable BIOS helps with newer kits, but do this at your own risk.
Mistake 2: Assuming XMP and EXPO are identical on every board. Some AM5 boards list both standards, others list only EXPO. If you buy an XMP-only kit for a board that only advertises EXPO, the profile may not appear or may require manual timing and voltage entry. Always match the kit standard to what the spec sheet says the board supports, and verify that the BIOS shows the expected profile name before saving.
Mistake 3: Forgetting that memory overclocking raises power and heat and can affect stability elsewhere. Enabling a profile raises DRAM voltage and can increase overall system load, so an undersized power supply or poor airflow can turn a memory issue into a system crash. Make sure your PSU has headroom over the combined CPU and GPU draw and follows the GPU maker recommended wattage, keep VRM and DIMM areas ventilated, and avoid copying random voltage settings from forums. If the system becomes unstable after enabling the profile, revert to disabled, confirm the system is stable at JEDEC, then try the profile again with a slightly lower frequency.
Who Should Wait or Buy Differently
This type of tuning is not ideal for builders who need absolute stability for work on day one without any troubleshooting, or for anyone who has not yet verified that their chosen RAM kit is on the board QVL. It is also not a good fit if you plan to mix two different kits or fill all four DIMMs with a very high speed rating and expect the top overclock numbers to work automatically. In those cases, wait until you can buy a validated 2-stick EXPO kit at a modest speed, or choose a board that explicitly lists both AMD EXPO and Intel XMP support so you have more kit options, and be prepared to run at JEDEC while you confirm stability. As of September 2026, BIOS maturity for newer Ryzen generations is still improving, so waiting for a stable BIOS release can be the smarter move than chasing the highest MT/s figure.
Frequently Asked Questions
Do I enable EXPO or XMP on an AM5 motherboard?
On AM5, choose EXPO if your kit is EXPO rated and your board lists EXPO support, which most AM5 boards do. Choose XMP only if your kit is XMP-only and your board spec sheet lists Intel XMP Memory Module Support as well. Both options are in the same BIOS area and both apply frequency, timings, and voltage from the RAM.
Where is the EXPO or XMP setting in BIOS?
Enter BIOS with Delete during boot, look for the memory profile selector on the Easy Mode front page or under the overclocking, tweaker, or DRAM settings in Advanced Mode. Select Profile 1, verify the target frequency and voltage shown, then Save and Exit. The board will retrain memory and may reboot once or twice before posting.
What if the system will not boot after enabling EXPO or XMP?
Clear CMOS or let the board retry until it falls back to JEDEC, then enter BIOS and disable the profile to confirm the system is stable at default. From there, try the profile again with two DIMMs in the recommended slots, check the QVL, and consider a BIOS update only if the vendor lists improved memory compatibility, remembering that updates are at your own risk. If it still fails, the kit may need a lower frequency or looser timings than the box rating.




Write Your Review
No reviews yet. Be the first to share your experience!